Member-only story
How to create your own Arduino Library
At some stage you are going to write some code that you want to package up as a library. This makes it easy for you and others to use the software, hides complexity and is a way to participate in the global maker community. There are a few exisiting guides about how to do this, we have focussed on material not covered by these beginner tutorials. A library is a collection of header (.h) and optional program (.cpp) files located in a single directory.
Sketch First
Start with a working sketch, don’t write the library until you know that your code works. Using a library can make things harder to debug, and nobody wants that! As an example to work through, we are going to create an Arduino library for the Reefwing Motor Shield (Figure 2) that connects to an UNO.
The Reefwing motor shield uses the L293B h-bridge chip and includes a voltage divider circuit to monitor the battery voltage. With LiPo batteries you don’t want to over discharge them as it can wreck the battery, or worse they can catch fire and explode!

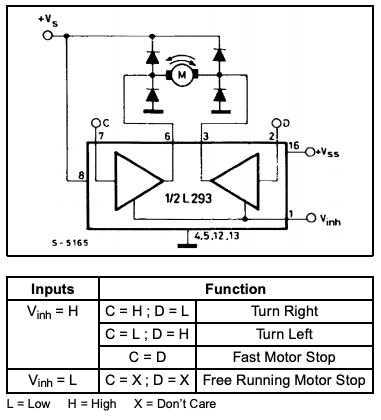
One L293B chip allows us to control two bidirectional motors with a stall current up to 2A. It expects an RMS current of 1A. In the L293, motor direction is controlled by the state of two input pins (Figure 1) and speed is controlled by applying a PWM signal to the enable pin.

The control pins for Motor 1 (M1) and the pin connections for the UNO (in bold) on our shield are:
- D3 — Chip Enable M1
- D2 — M1 Input 1 (D in Figure 1)
- D4 — M1 Input 2 (C in Figure 1)
- M1 Output 1 (to one terminal of M1)
- M1 Output 2 (to the other terminal of M1)
Similarly for Motor 2 (M2):
- D11 — Chip Enable M2
- D7 — M2 Input 3

